러닝 기록을 영상으로 남기는 법
How to turn your runs into shareable videos
이 글은 러닝 기록을 영상으로 만들고 공유하는 방법과 프라이버시를 다룹니다. 건강·운동 처방이 아니며, 운동 강도나 몸 상태는 전문가와 상의하세요. 앱 설명은 iPhone 기준입니다.
숫자에 장면을 붙이면 달라지는 것
달리기가 끝나면 손목 위의 숫자들은 금방 잊힙니다. 5분 12초 페이스, 평균 심박 152 같은 값은 정확하지만 그날 어떤 길을 지났는지, 어디서 힘들었는지는 떠올리기 어렵습니다. 경로를 영상으로 다시 따라가면 오르막이 어디였는지, 어느 구간에서 속도가 올랐는지를 기억과 함께 확인할 수 있고, 친구에게 보여 주기도 쉽습니다. 이 글은 어떤 도구를 쓰든 통하는 준비, 프라이버시, 공유 순서를 먼저 다루고, 후반에 RunVue로 실제로 만드는 과정을 보여 줍니다.
영상에 필요한 데이터
경로 영상의 최소 재료는 시간 순서가 있는 위치 점들입니다. 여기에 심박이나 고도가 더해지면 화면에 표시할 수 있는 정보가 늘어납니다. 데이터는 보통 세 경로로 들어옵니다.
| 출처 | 경로(GPS) | 심박 | 메모 |
|---|---|---|---|
| 스마트워치 운동 앱 → 건강 앱 | 야외 러닝이면 저장됨 | 있음 | 가장 간편. 운동 종류를 "야외 러닝"으로 선택해야 경로가 기록됨 |
| 스마트폰 러닝 앱 | 저장됨 | 센서가 없으면 없음 | 앱이 건강 앱에 기록을 내보내도록 설정해야 다른 앱에서 보임 |
| GPX 파일 | 점 목록으로 포함 | 파일에 따라 다름 | Garmin 등 건강 앱에 경로를 쓰지 않는 기기의 기록을 옮길 때 유용 |
| 실내 러닝머신 | 없음 | 있을 수 있음 | 이동 경로가 없어 경로 영상 불가 |
GPX는 GPS 데이터(웨이포인트, 루트, 트랙)를 응용 프로그램 사이에서 주고받기 위한 가벼운 XML 형식입니다. 텍스트 파일이어서 열어 보면 위도·경도·시각이 줄지어 있고, 그래서 수정과 점검이 쉽다는 장점이 있지만, 기록한 시각과 위치가 그대로 담겨 있다는 점이 아래 프라이버시 문제와 연결됩니다.
GPS 정확도의 함정
스마트폰 GPS는 하늘이 열린 곳에서는 비교적 정확하지만, 건물·다리·나무 근처에서는 신호 차단과 반사 때문에 정확도가 크게 나빠집니다. 신호가 가려지거나 건물에 반사되는 다중 경로 때문입니다. 영상에서는 다음 모습으로 나타납니다.
- 출발 직후 경로가 튐. 신호가 안정되기 전에 출발하면 첫 수십 미터가 엉뚱하게 그려집니다. 하늘이 보이는 곳에서 신호가 잡힐 때까지 기다린 뒤 시작하세요.
- 고층 건물 사이, 터널, 지하도. 경로가 옆 블록으로 밀리거나 건물을 가로지릅니다. 영상 도구가 도로에 맞춰 보정해 주더라도 완벽하지는 않습니다.
- 일시정지 후 재시작. 정지한 지점과 재시작 지점 사이에 직선이 생길 수 있습니다.
- 절전 모드. 위치 갱신 빈도를 낮추는 설정이면 코너가 둥글게 뭉개집니다.
- 실내·러닝머신 기록. 경로가 없으니 만들 수 없습니다.
원본 GPS가 나쁘면 어떤 편집 도구도 완전히 되살리지 못합니다. 영상이 이상하다면 앱을 의심하기 전에 원본 경로를 지도에서 먼저 확인해 보세요.
프라이버시: 시작과 끝 위치를 다룬다
러닝 영상은 사진보다 구체적인 위치 정보를 담습니다. 전체 경로가 보이면 사는 곳과 평소 움직이는 패턴을 짐작할 수 있습니다. 특히 집에서 출발해 집으로 돌아오는 코스는 집 위치를 그대로 보여 줍니다.
- 출발·도착 지점을 바꾼다. 집 앞이 아니라 근처 공원이나 다른 골목에서 기록을 시작하면 가장 확실합니다.
- 경로 일부를 숨기는 기능이 있는 도구를 쓴다. 일부 서비스는 시작과 끝 구간을 가립니다. 도구가 이 기능을 제공하는지 먼저 확인하세요.
- 공개 범위를 좁힌다. 공개 계정에는 코스가 특정되지 않는 영상만, 집 근처 코스는 친구에게만 보냅니다.
- 실시간으로 올리지 않는다. 달리는 도중이나 직후에 올리면 지금 그 근처에 있다는 정보가 됩니다. 시간을 두고 올리세요.
- 배경에 지명·간판이 나오는지 확인한다. 영상 속 지도 이름과 엔딩 문구도 위치 단서입니다.
- GPX 파일을 공유할 때는 원본 대신 편집본을. 파일에는 정확한 좌표와 시각이 있으므로, 시작과 끝 부분을 잘라 낸 뒤 보내세요.
- 심박·칼로리도 건강 정보다. 공개 영상에 넣을지 한 번 더 생각하세요.
영상 형태와 길이 정하기
스마트폰에서 보는 소셜 영상은 세로(9:16) 화면이 기본입니다. RunVue도 세로 9:16 영상을 만듭니다. 각 플랫폼의 정확한 해상도·길이 규격은 수시로 바뀌므로 업로드 직전에 해당 서비스의 도움말을 확인하세요. 확인된 사실로는 YouTube의 도움말이 Shorts를 최대 3분 길이의 짧은 영상으로 소개합니다. 다른 서비스의 수치는 여기서 단정하지 않습니다.
길이는 짧은 쪽이 끝까지 보게 만듭니다. 한 시간의 러닝을 한 시간짜리 영상으로 만들 이유는 없고, 직선 구간은 빠르게 지나가고 의미 있는 구간만 천천히 보여 주는 가변 속도가 효과적입니다. 시점은 세 가지가 있습니다. 하늘 시점은 코스 전체의 모양(하트 모양 코스처럼)을 보여 주고, 뒤따르는 3인칭은 방향 감각을 유지하기 좋으며, 1인칭은 몰입감이 크지만 오래 이어지면 멀미를 느끼는 사람이 있어 짧게 쓰는 편이 낫습니다. 화면에 올리는 수치는 페이스, 거리와 시간, 미니맵 정도면 충분합니다.
RunVue로 만드는 순서
RunVue는 SETLOG가 만든 iPhone용 앱으로, 이미 기록된 야외 러닝을 짧은 3D 리플레이로 바꿉니다. 직접 측정하지 않으므로 시계나 다른 러닝 앱이 먼저 기록해야 합니다.
1단계. 러닝 고르기 또는 파일 가져오기
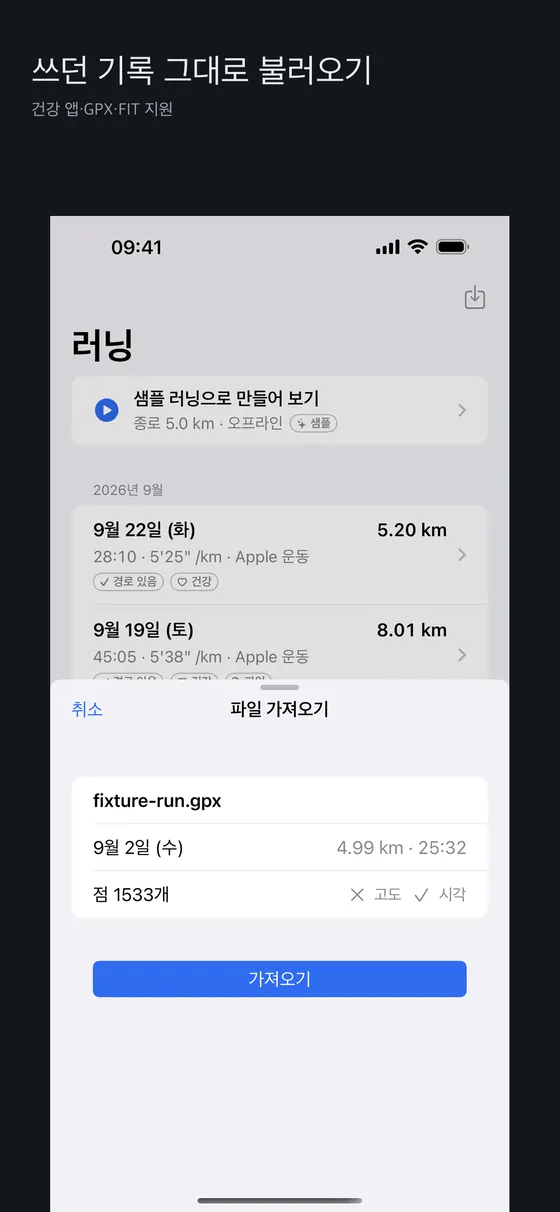
처음 열면 건강 앱의 운동 읽기 권한을 묻습니다. 앱이 읽는 항목은 영상에 필요한 운동 기록과 경로, 심박 등으로 제한되며, 생년월일과 체중은 수집하지 않는다고 앱 문서에 명시되어 있습니다. 목록에서 영상으로 만들 러닝을 고르거나, 건강 앱에 경로를 쓰지 않는 기기의 기록은 GPX·FIT 파일을 공유 시트나 파일 앱으로 가져옵니다. 러닝이 아직 없다면 샘플 러닝으로 결과를 먼저 볼 수 있습니다. 화면의 "경로 있음" 표시가 붙은 러닝이 경로 영상이 가능한 기록입니다.
2단계. 설정하고 프리뷰 만들기
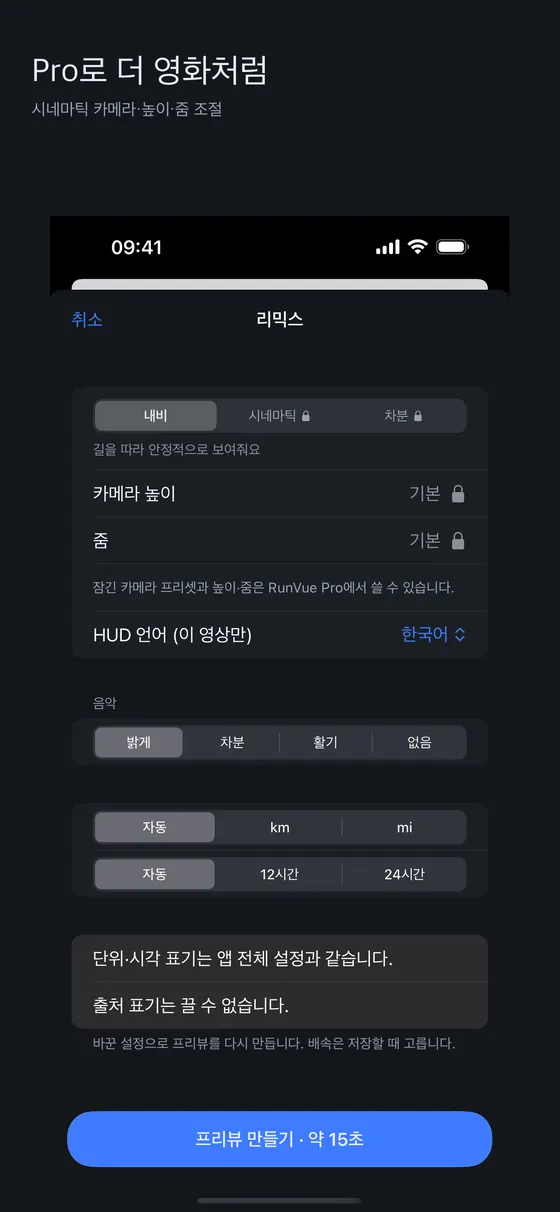
리믹스 화면에서 카메라와 HUD 언어, 음악, 단위를 고르면 프리뷰 영상을 만듭니다. 무료로는 내비 카메라와 1배속 요약 영상, 속도·심박 파형을 쓸 수 있고, 2~60배속, 시네마틱·차분 카메라 프리셋, 카메라 높이와 줌은 구독(Pro) 기능이라고 안내됩니다. 시스템에서 동작 줄이기를 켠 경우에는 차분 프리셋을 무료로 쓸 수 있습니다. 영상 길이는 달린 거리에 따라 22초, 27초, 32초 중 하나로 정해지며, 기기에서 직접 렌더링하므로 오래된 기기에서는 더 걸립니다. 만드는 동안에는 앱을 앞에 두고 충전기를 연결하세요.
3단계. 결과 확인과 보관
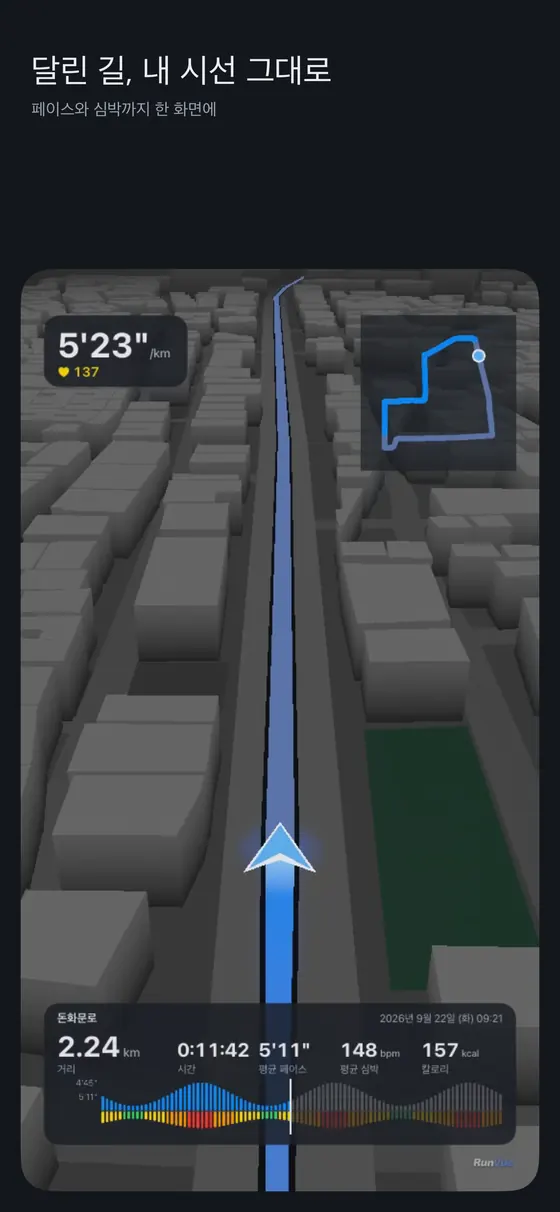
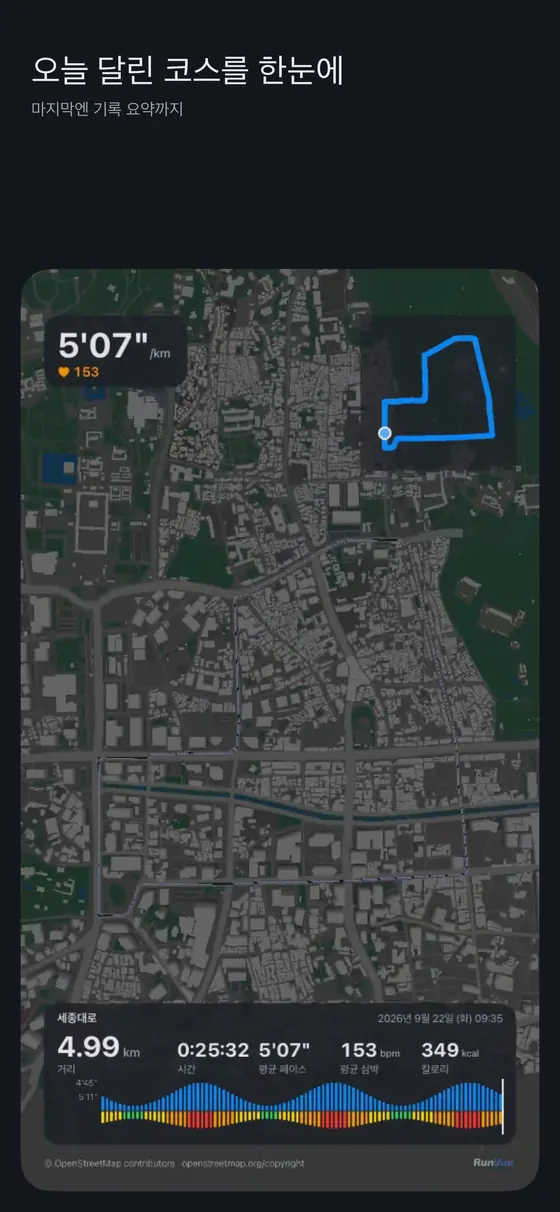
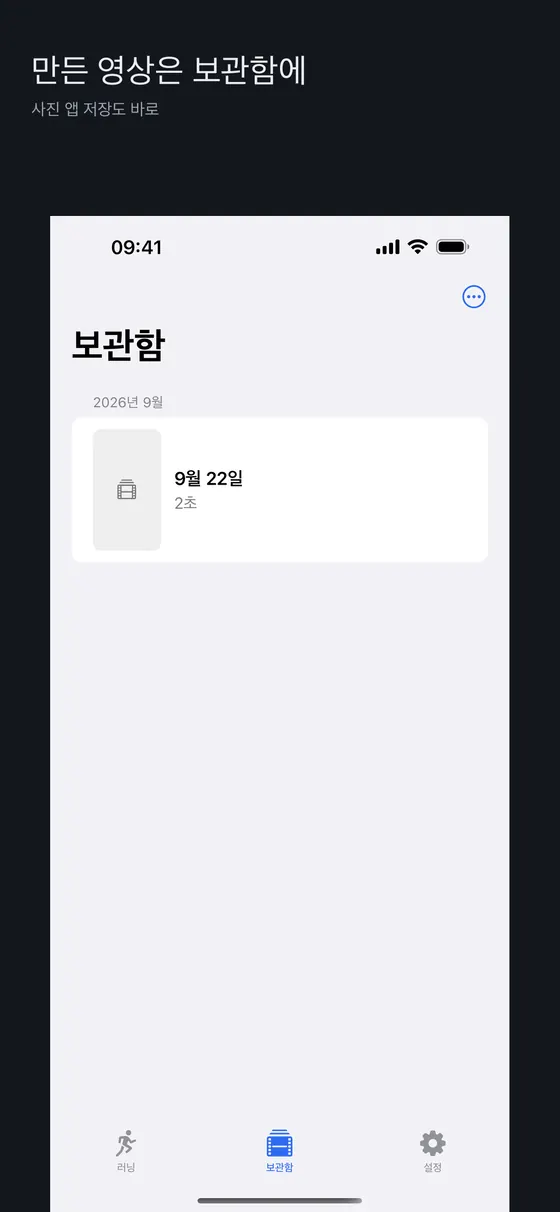
영상은 추적 3인칭으로 시작해 하이라이트 구간에서 1인칭으로 바뀌고, 마지막에 하늘 시점에서 전체 코스와 요약을 보여 줍니다. 만든 영상은 보관함에 쌓이고 사진 앱에 저장하거나 공유 시트로 보낼 수 있습니다.
공유 전 마지막 점검
RunVue 영상은 출발부터 도착까지 전체 경로를 그대로 보여 줍니다. 경로를 가리는 기능은 없고, 앱은 공유 직전에 집 위치 노출에 대한 안내를 합니다. 따라서 위 프라이버시 절의 방법, 즉 출발 지점을 바꾸거나 공개 범위를 좁히는 것은 사용자가 직접 해야 합니다.
RunVue의 한계를 솔직하게
- 직접 측정하지 않습니다. 기록은 건강 앱 또는 GPX·FIT 파일에서만 가져옵니다. 러닝 중 실시간 안내가 필요하면 다른 앱을 쓰세요.
- 경로 숨김이 없습니다. 집 근처 코스는 공유 범위를 직접 관리해야 합니다.
- 워터마크와 지도 출처 표기가 항상 들어갑니다. 무료와 Pro 모두 같고, 지도 데이터(OpenStreetMap) 출처 표기는 라이선스상 영상 시작과 끝에 포함됩니다.
- 지도 품질이 지역마다 다릅니다. OpenStreetMap 기반이라 건물 높이 정보가 부족한 지역에서는 평균적인 높이로 그립니다.
- 네트워크가 필요할 수 있습니다. 지도 타일을 받는 동안 연결이 필요하며, 경로 자체는 기기 밖으로 나가지 않도록 설계되었다고 합니다.
- Android. 이 글의 설명은 iPhone 기준입니다. Android 버전의 제공 여부와 기능 범위는 iPhone과 다를 수 있으니 Google Play 안내를 확인하세요.
- 시점·배속·카메라 일부는 구독이 필요합니다.
이런 분께 맞습니다
- 이미 시계로 기록하고 있고 결과를 영상으로 남기고 싶은 분
- 같은 코스를 반복해서 달리며 기록을 모으는 분
- 세로 짧은 영상을 직접 올리는 분
이런 분께는 맞지 않습니다
- 집 근처 코스를 앱 안에서 가리고 싶은 분
- 실내 러닝머신 기록으로 영상을 만들려는 분
- 러닝 중 코칭이나 훈련 계획이 필요한 분
사용법 전체는 RunVue 사용 가이드, 러닝 중 페이스 코칭은 IntervalRunner 가이드에서 다룹니다.
촬영부터 게시까지의 점검 순서
한 번 만들어 보면 순서가 손에 익지만, 처음에는 단계마다 놓치는 것이 생깁니다. 아래 순서로 한 번 훑어 보세요.
- 달리기 전. 운동 앱에서 종류를 야외 러닝으로 고르고, 위치 권한이 "항상" 또는 "앱 사용 중"으로 허용되어 있는지 확인합니다. 하늘이 보이는 곳에서 신호가 잡힐 때까지 기다립니다.
- 달린 직후. 기록을 저장하고, 건강 앱에 경로가 들어갔는지 확인합니다. 시계의 동기화에는 시간이 걸릴 수 있습니다.
- 만들기 전. 경로를 지도에서 한 번 훑어 튀는 점이 없는지 봅니다. 시작·끝이 집 근처인지도 이때 정합니다.
- 만든 뒤. 영상을 처음부터 끝까지 보고 지명, 집 근처 길, 심박 같은 표시가 공개해도 되는지 확인합니다.
- 게시. 공개 범위를 정하고, 가능하면 달린 지 몇 시간이 지난 뒤에 올립니다.
이 순서를 따르면 영상이 이상할 때 원인이 데이터인지 도구인지 쉽게 가려집니다. 같은 코스를 일정 간격으로 만들어 모아 두면 계절에 따른 변화나 페이스 차이를 한눈에 비교할 수 있다는 점도 장점입니다. 다만 같은 코스를 반복해서 공개하면 그 코스가 당신의 일상 경로라는 사실이 더 분명해지므로, 반복되는 동네 코스일수록 공개 범위를 더 좁게 두세요.
자주 하는 실수
- GPS가 잡히기 전에 출발해 경로 앞부분이 직선으로 튀는 경우
- 공개 계정에 집에서 출발한 경로를 그대로 올리는 경우
- 한 영상에 지표를 너무 많이 넣어 읽을 수 없게 만드는 경우
- 1인칭 장면을 길게 이어 붙여 시청자가 멀미를 느끼는 경우
- GPX 원본 파일을 편집 없이 공유하는 경우
출처 및 더 읽을거리
- TopoGrafix, GPX: the GPS Exchange Format (https://www.topografix.com/gpx.asp)
- YouTube Help, YouTube Shorts (최대 3분) (https://support.google.com/youtube/answer/10059070)
- RunVue 사용 가이드 (앱 기능은 프로젝트 문서와 앱스토어 설명 기준)
자주 묻는 질문
러닝 영상을 만들려면 어떤 데이터가 필요한가요?
시간 순서가 있는 위치 점(경로)이 필요하고 심박은 선택입니다. 건강 앱에 저장된 야외 러닝이나 GPX·FIT 파일을 쓸 수 있고, 실내 러닝머신 기록은 경로가 없어 만들 수 없습니다.
집 위치가 영상에 노출되지 않게 하려면?
출발·도착 지점을 집이 아닌 곳으로 바꾸고, 공개 범위를 좁히고, 실시간으로 올리지 않으세요. RunVue는 전체 경로를 보여 주고 경로를 가리는 기능이 없으므로 이런 방법을 직접 적용해야 합니다.
GPS 경로가 튀는 이유는?
건물·다리·나무 근처에서 신호가 가려지거나 반사되기 때문입니다. 하늘이 열린 곳에서 신호가 잡힌 뒤 출발하는 것이 가장 효과적입니다.
RunVue 영상은 어떤 비율과 길이인가요?
세로 9:16이며 달린 거리에 따라 22초, 27초, 32초 중 하나입니다. 각 플랫폼의 업로드 규격은 올리기 전에 해당 서비스 도움말로 확인하세요.
RunVue가 러닝을 직접 기록하나요?
아니요. 건강 앱에 저장된 기록이나 GPX·FIT 파일을 가져와 영상으로 만드는 앱입니다.
This guide covers making and sharing run videos, and privacy. It is not health or training advice; talk to a professional about intensity or your condition. App descriptions refer to the iPhone version.
What a picture adds to the numbers
After a run, the figures on your wrist fade quickly. A 5:12 pace and an average heart rate of 152 are accurate, but they do not tell you which streets you took or where it got hard. Replaying the route as video lets you check where the climb was and where you sped up, and it is easier to show a friend. This article covers preparation, privacy and sharing habits that work with any tool, then walks through making a video with RunVue.
The data a video needs
The minimum is a time-ordered list of position points; heart rate and elevation add more to display. Data usually arrives by one of three routes.
| Source | Route (GPS) | Heart rate | Note |
|---|---|---|---|
| Watch workout app to health app | Saved for outdoor runs | Yes | Easiest. Pick "outdoor run" so the route is recorded |
| Phone running app | Saved | None without a sensor | The app must write to the health app for other apps to see it |
| GPX file | Included as points | Depends on the file | Useful for devices such as Garmin that do not write routes to the health app |
| Indoor treadmill | None | Possibly | No path, so no route video |
GPX is a light-weight XML format for exchanging GPS data (waypoints, routes and tracks) between applications. It is a plain text file with latitude, longitude and time listed in order, which makes it easy to inspect and edit, but it also means the exact positions and times travel with it, which matters for the privacy section below.
GPS accuracy pitfalls
Smartphone GPS is reasonably accurate under open sky, but accuracy worsens near buildings, bridges and trees because of signal blockage and reflections (multipath). In a video it shows up as:
- A jumpy start. Leaving before the signal settles draws the first tens of metres wrongly. Wait under open sky until it locks.
- Tall buildings, tunnels, underpasses. The route shifts a block or cuts through buildings. Road matching in a video tool helps but is not perfect.
- Pause and resume. A straight line can appear between the stop and restart points.
- Battery saver. Lower update frequency rounds off corners.
- Indoor or treadmill runs. No route, so nothing to render.
No editor can fully rescue poor source GPS. If a video looks odd, inspect the raw route on a map before blaming the app.
Privacy: handle the start and end
A run video carries more specific location than a photo. A full route can hint at where you live and when you move. A loop that starts and ends at your door shows your door.
- Move the start and finish. Starting from a nearby park or a different street is the surest fix.
- Use a tool that can hide route ends. Some services mask the start and end; check first whether yours does.
- Narrow the audience. Post only non-identifying courses publicly; send home-area courses to friends.
- Do not post in real time. Posting during or right after a run says you are there now. Wait.
- Check for place names and signs in the video, including map labels and the closing text.
- Share an edited GPX, not the original. It holds exact coordinates and times; trim the start and end first.
- Heart rate and calories are health data too. Think before adding them to a public video.
Choosing format and length
Phone-first social video is vertical (9:16), and RunVue produces 9:16 video. Exact resolution and length rules change, so check each platform's help page right before uploading. One verified fact: YouTube's help describes Shorts as short videos up to 3 minutes long. I do not assert figures for other services here.
Shorter is more likely to be watched to the end. A one-hour run does not need a one-hour video; variable speed that skips straight sections and slows on the interesting parts works well. There are three viewpoints. Sky view shows the shape of the whole course (a heart-shaped route, say); a chase third-person view keeps a sense of direction; first-person is immersive but can cause motion sickness if it runs long, so keep it short. For overlays, pace, distance and time, and a minimap are plenty.
Making one with RunVue
RunVue, made by SETLOG, is an iPhone app that turns an already-recorded outdoor run into a short 3D replay. It does not measure runs itself, so your watch or another running app must record first.
Step 1. Pick a run or import a file
On first launch it asks for read access to workouts in the health app. Per the app's documentation it reads only what the video needs (workouts, routes, heart rate) and does not collect date of birth or weight. Choose a run from the list, or import a GPX or FIT file via the share sheet or Files for devices that do not write routes to the health app. With no runs yet you can try the sample run. A run marked as having a route is eligible for a route video.
Step 2. Set options and make a preview
On the remix screen choose camera, HUD language, music and units, then make the preview. Free use includes the Navi camera, a 1x summary video and the pace and heart-rate waveform; speeds from 2x to 60x, the Cinematic and Calm camera presets, and camera height and zoom are subscription (Pro) features per the app. If iOS Reduce Motion is on, the Calm preset is free. Video length is fixed at 22, 27 or 32 seconds depending on distance, and rendering happens on the device, so older phones take longer. Keep the app in front and plugged in while it renders.
Step 3. Check the result and keep it
The video opens in a chase third-person view, switches to first person at highlight sections, and ends in sky view with the whole course and a summary. Finished videos collect in the library; save to Photos or send through the share sheet.
Last check before sharing
A RunVue video shows the full route from start to finish. There is no route-masking feature, and the app gives a notice about home exposure just before sharing. So the methods in the privacy section, moving the start point and narrowing the audience, are up to you.
RunVue's limits, honestly
- It does not record runs. It imports from the health app or GPX and FIT files only. For live coaching, use another app.
- No route hiding. You manage who sees home-area courses.
- The watermark and map credit are always present, free or Pro. The OpenStreetMap credit is included at the start and end of the video under the data licence.
- Map detail varies by region. It is OpenStreetMap-based; where building heights are missing, it draws an average height.
- It may need a connection while map tiles download; the route itself is designed to stay on the device.
- Android. This description is for iPhone. Availability and features on Android may differ; check the Google Play listing.
- Some camera and speed options need a subscription.
A good fit
- You already record with a watch and want a keepsake video
- You repeat the same course and collect runs
- You post short vertical video
Not a fit
- You want to mask home-area routes inside the app
- You only have indoor treadmill data
- You need in-run coaching or a training plan
Full usage is in the RunVue guide; for in-run pace coaching see the IntervalRunner guide.
From recording to posting: a checklist
Once you have made one, the order becomes second nature, but at first each step has something to miss. Walk through this sequence.
- Before the run. Pick outdoor run in the workout app and confirm location permission is allowed. Wait under open sky until the signal locks.
- Right after. Save the workout and confirm the route reached the health app. Watch sync can take a while.
- Before making. Scan the route on a map for jumps, and decide here whether the start and end are near home.
- After making. Watch the whole video and check that place names, streets near home and heart rate are fine to make public.
- Posting. Choose the audience and, where possible, post some hours after the run.
With this order, when a video looks wrong it is easy to tell whether the cause is data or tool. Collecting videos of the same course at intervals also lets you compare seasons and pace at a glance. But repeatedly publishing the same course makes it clearer that it is your daily route, so the more a local loop repeats, the narrower the audience should be.
Common mistakes
- Starting before GPS locks, so the first stretch is a straight line
- Posting a route from your home publicly
- Packing in so many stats the video is unreadable
- Stringing together long first-person scenes that make viewers queasy
- Sharing a raw GPX file without editing
Sources and further reading
- TopoGrafix, GPX: the GPS Exchange Format (https://www.topografix.com/gpx.asp)
- YouTube Help, YouTube Shorts (up to 3 minutes) (https://support.google.com/youtube/answer/10059070)
- RunVue guide (app features per project documentation and the App Store description)
FAQ
What data do I need for a run video?
A time-ordered list of position points (the route); heart rate is optional. Outdoor runs saved in the health app or GPX and FIT files work. Indoor treadmill runs have no route.
How do I avoid exposing my home?
Change where you start and finish, narrow the audience and do not post in real time. RunVue shows the whole route and has no masking feature, so apply these yourself.
Why does my GPS route jump?
Signals are blocked or reflected near buildings, bridges and trees. Wait for a lock under open sky before starting.
What aspect ratio and length does RunVue produce?
Vertical 9:16, and 22, 27 or 32 seconds depending on distance. Check each platform's help for upload specs.
Does RunVue record runs?
No. It imports runs from the health app or GPX and FIT files and renders them as video.