악기 연습을 위한 스템 분리 활용법
Practicing an instrument or vocals with AI stem separation
왜 스템 분리가 연습에 도움이 되는가
악기를 배울 때 가장 흔한 어려움은 두 가지입니다. 곡 속에서 내 파트가 정확히 무슨 소리인지 구별해 듣기 어렵다는 것, 그리고 혼자 연습할 때 함께 연주할 밴드가 없다는 것입니다. 스템 분리는 하나로 섞인 음원을 보컬, 드럼, 베이스, 그 밖의 악기 같은 파트별 트랙(스템)으로 나눕니다. 나뉜 트랙으로 내 파트만 단독으로 들으며 채보하거나, 내 파트만 빼고 나머지 반주에 맞춰 연주할 수 있습니다. 예전에는 멀티트랙 원본이나 전용 연습 음원이 있어야 가능했던 일입니다.
다만 이 기술은 마법이 아닙니다. 결과물에는 알아 둘 한계가 있고, 그 한계를 알아야 어떤 연습에 쓰고 어떤 연습에는 쓰지 말아야 하는지 판단할 수 있습니다. 이 글은 도구와 상관없이 적용되는 원리와 루틴을 먼저 정리하고, 후반에 하나의 사례로 필자가 만든 앱을 소개합니다.
스템 분리는 어떻게 작동하는가
스피커에서 나오는 소리는 이미 여러 악기가 더해진 하나의 파형입니다. 사람의 귀는 이 합쳐진 소리에서 악기를 구별하지만, 컴퓨터가 파형만 보고 "이 부분은 베이스, 이 부분은 보컬"로 나누는 것은 어려운 문제입니다. 최근의 분리 모델은 이 문제를 신경망으로 풀어, 수많은 곡에서 "섞인 소리"와 "원래 파트들"의 짝을 학습한 뒤 새 곡의 섞인 소리에서 각 파트를 추정합니다.
대표적인 오픈소스 모델 Demucs 계열은 파형 자체와 주파수 분포(스펙트로그램)를 함께 다루는 하이브리드 구조에 트랜스포머를 결합한 방식을 연구 논문으로 공개했습니다. 그 논문(Hybrid Transformers for Music Source Separation)은 MUSDB 평가에서 추가 학습 데이터 800곡을 쓴 설정으로 SDR 9.20dB를 보고합니다 [1]. SDR은 분리가 원본에 얼마나 가까운지를 재는 지표로, 값이 높을수록 좋지만 숫자 하나가 귀로 듣는 느낌을 완전히 대변하지는 않습니다. 이 모델은 기본적으로 드럼, 베이스, 보컬, 기타(other) 네 개의 스템으로 나누고, 기타와 피아노를 추가한 여섯 스템 실험 모델도 제공하는데 문서는 피아노 스템이 "아직 잘 작동하지 않는다"고 직접 밝히고 있습니다 [2].
핵심은 분리가 "정답을 꺼내는 것"이 아니라 "추정"이라는 점입니다. 모델은 섞인 소리에서 각 파트가 있을 법한 부분을 추정해 나눕니다. 그래서 학습 때 많이 본 편성(보컬+밴드)에서는 잘 되고, 학습에서 드문 소리나 여러 악기가 겹친 구간에서는 틀릴 수 있습니다.
품질의 한계: 아티팩트와 번짐
- 아티팩트: 분리된 트랙에서 물속에서 듣는 듯한 울림, 금속성 잡음, 소리가 떨리는 느낌이 날 수 있습니다. 모델이 나눠낸 부분과 원래 소리가 정확히 일치하지 않아서 생깁니다.
- 번짐(bleed): 드럼 트랙에서 보컬 일부가 들리거나 보컬에 하이햇이 섞이는 식으로 다른 파트가 새어 들어옵니다. 같은 주파수 대역에서 소리가 겹칠수록 심합니다.
- 곡에 따른 편차: 악기 편성이 단순하고 녹음이 깨끗한 곡은 잘 분리되고, 코러스·효과음·리버브가 많은 곡은 품질이 떨어집니다.
- 세분화된 파트: 기타나 피아노처럼 세부 파트는 기본 네 파트보다 정확도가 낮은 경우가 많습니다. Demucs의 README도 기타는 괜찮은 편이지만 피아노는 번짐과 아티팩트가 많다고 적고 있습니다 [2].
- 합쳐도 원곡이 아님: 분리된 파트를 모두 다시 합쳐도 원곡과 완전히 같지는 않습니다.
이 한계에서 나오는 사용 원칙은 단순합니다. 분리 결과는 연습 보조 자료로 쓰고, 채보의 최종 확인은 원곡과 악보, 그리고 자신의 귀로 하세요. 예를 들어 분리된 기타 트랙에서 들리는 한 음이 의심스러우면 원곡으로 돌아가 같은 구간을 다시 듣고 비교합니다.
결과를 좋게 만드는 입력 팁
- 무손실 또는 높은 비트레이트 음원을 쓰세요. 압축이 심한 음원은 이미 정보가 깎인 상태라 분리 결과의 잡음이 더 두드러집니다. 가능하면 WAV, FLAC, ALAC 같은 무손실 파일에서 출발하세요.
- 라이브 녹음보다 스튜디오 녹음이 유리합니다. 관객 소리, 공간 울림이 섞인 라이브는 파트 경계가 흐려집니다.
- 이어폰·헤드폰으로 확인하세요. 스피커로 들으면 번짐이나 아티팩트를 구별하기 어렵습니다.
- 무엇을 끌지 목적으로 정하세요. 아래 표를 참고하세요.
- 출력 형식을 구분하세요. 연습만 한다면 앱 안에서 파트를 끄고 켜기만 해도 충분합니다. 파일로 내보내는 것은 다른 플레이어나 녹음 프로그램에서 쓰려는 경우에만 필요합니다.
| 연습 목적 | 끄는 파트 | 들을 파트 | 유의점 |
|---|---|---|---|
| 드럼 연주 | 드럼 | 베이스·기타·보컬 | 드럼 번짐이 남아 있어도 박자 감각 연습에는 지장이 적음 |
| 베이스 연주 | 베이스 | 드럼·나머지 | 저음은 이어폰이 약하면 구별이 어려움 |
| 기타·건반 연주 | 기타 또는 피아노 | 리듬 섹션·보컬 | 이 파트의 분리 정확도가 낮을 수 있음. 원곡과 번갈아 확인 |
| 보컬 연습 | 보컬(반주만 듣기) | 반주 | 가사 발음 확인에는 보컬만 단독으로 듣기 |
| 채보·청음 | 끄지 않고 단독 듣기 | 한 파트씩 | 정답이 아니라 단서로 사용 |
파트별 연습 워크플로
드러머
드럼을 끄고 나머지를 재생하면 실제 곡의 베이스·기타·보컬에 맞춰 치는 연습이 됩니다. 메트로놈만 켜고 치는 것보다 곡의 흐름과 마디 구조를 몸에 익히기 좋습니다. 반대로 드럼 트랙만 단독으로 들으면 필인 순서와 하이햇 패턴을 확인할 수 있습니다. 어려운 필인은 한두 마디만 반복 구간으로 잡고 속도를 낮춰 손 순서부터 정리하세요.
베이시스트
베이스는 저음역이라 일반 이어폰으로는 음을 구별하기 어렵습니다. 베이스만 단독으로 듣고, 필요하면 속도를 낮춰 음 하나하나를 확인하세요. 채보가 끝나면 베이스를 끄고 드럼과 함께 연주하며 킥 드럼과의 호흡을 맞추는 단계로 넘어갑니다.
기타리스트와 건반 연주자
기타와 피아노는 스템 분리에서 품질이 가장 들쭉날쭉한 영역입니다. 여러 악기가 같은 음역에서 겹치기 때문입니다. 분리된 트랙을 정답으로 믿기보다 단서로 쓰고, 애매한 부분은 원곡과 번갈아 들어 확인하세요. 코드 진행을 파악한 뒤에는 기타 파트를 끄고 리듬 섹션과 함께 연주해 보는 것이 가장 실용적입니다.
보컬 연습생
보컬 트랙만 단독으로 들으면 호흡 위치, 음정 처리, 발음이 잘 들립니다. 따라 부르며 구간을 반복해 익힌 다음, 보컬을 끄고 반주 위에서 불러 보세요. 분리된 반주에는 원곡 보컬의 잔향이 약하게 남을 수 있어서, 처음엔 따라 부르는 소리와 헷갈릴 수 있다는 점을 기억하세요.
느리게 시작해 속도 올리기
스템 분리만큼 중요한 것이 음정을 유지하는 배속과 구간 반복입니다. 음정이 같이 내려가면 악기 튜닝과 맞지 않아 연주 연습이 불가능하므로, 반드시 음정 보존(time-stretch) 방식의 배속을 쓰세요. 아주 느린 속도에서는 소리가 약간 뭉개질 수 있으니 속도 변화가 큰 연습일수록 원곡을 번갈아 들어 감각을 유지하세요. 추천 루틴은 다음과 같습니다.
- 어려운 한두 마디를 A-B 구간으로 지정합니다. 너무 길게 잡지 마세요(1~4마디).
- 원곡의 60퍼센트 정도 속도로 시작해 완전히 정확하게 칠 수 있는지 확인합니다.
- 같은 속도에서 연속 세 번 틀리지 않으면 5퍼센트에서 10퍼센트만 올립니다.
- 틀리기 시작하면 한 단계 내려가 정확도를 되찾습니다. 빨리 치는 것보다 정확하게 치는 것이 먼저입니다.
- 구간이 안정되면 앞뒤로 한 마디씩 넓혀 곡의 흐름에 연결합니다.
- 마지막으로 원곡 속도에서 분리한 반주, 또는 원곡 전체에 맞춰 연주합니다.
연습은 한 번에 길게 하기보다 20분에서 30분 단위로 나누는 편이 집중력 유지에 좋습니다. 이는 일반적인 요령이며 개인차가 있습니다. 손목·손가락·목에 통증이나 저림이 느껴지면 즉시 쉬고, 반복되면 전문가와 상담하세요. 이 글은 의료 조언이 아닙니다. 헤드폰 볼륨은 대화가 들릴 정도로 낮게 유지하는 것이 귀를 위해 안전합니다.
연습 템포 계획 계산기
원곡 BPM과 시작 속도, 단계 간격, 루프 길이, 단계당 반복 횟수를 넣으면 단계별 BPM과 소요 시간을 표로 만들어 줍니다. 예를 들어 120BPM 곡을 60퍼센트에서 시작해 10퍼센트씩 올리면 72, 84, 96, 108, 120BPM의 다섯 단계가 나옵니다. 한 단계를 연속으로 틀리지 않고 끝낼 때만 다음 단계로 올리는 방식으로 쓰세요.
반주에 맞춰 연주하기와 청음 훈련
백킹 트랙으로 합주 감각 익히기
내 파트를 끈 반주는 일종의 가상 밴드입니다. 메트로놈과 달리 곡의 다이내믹과 마디 전환이 그대로 들어 있어서, 언제 들어가고 언제 쉬어야 하는지를 곡 자체에서 배웁니다. 처음에는 느린 속도로 곡 전체를 끝까지 틀리지 않고 한 번 완주하는 것을 목표로 하고, 그다음 속도를 올리세요. 틀려도 멈추지 않고 이어 가는 연습도 중요합니다. 실제 합주에서는 멈출 수 없기 때문입니다.
분리된 트랙으로 하는 청음 연습
- 한 파트(예: 베이스)만 켜고 한 마디를 반복 재생합니다.
- 악기 없이 먼저 음을 부르거나 계이름으로 적습니다.
- 악기로 쳐서 소리와 맞는지 비교합니다.
- 맞는 음을 찾았다면 원곡으로 돌아가 같은 마디가 정말 그 음인지 한 번 더 확인합니다. 분리 결과의 아티팩트 때문에 잘못 들었을 수 있기 때문입니다.
- 연습한 구간은 날짜와 속도를 메모해 두면 진척이 보입니다.
같은 방식으로 코드 진행, 필인의 박 위치, 하모니 음정도 한 파트씩 따로 들으면 훨씬 선명해집니다. 어학 학습자도 같은 원리로 보컬만 켜고 발음을 따라 말한 뒤, 반주와 합쳐 억양을 맞춰 볼 수 있습니다.
내 연주 녹음해서 비교하기
스스로 듣는 연주와 밖에서 들리는 연주는 다릅니다. 연습 후반에는 내 연주를 녹음해 원곡과 비교하세요.
- 헤드폰으로 반주를 들으며 녹음하세요. 스피커로 틀면 반주가 녹음에 같이 들어갑니다.
- 폰의 음성 녹음으로 충분합니다. 같은 위치에서 녹음해야 비교가 공정합니다.
- 녹음 후에는 원곡 파트와 번갈아 들으며 박자(앞서거나 뒤처짐), 음정, 음색, 강약 중 하나만 골라 비교하세요. 한 번에 다 보려 하면 아무것도 고치지 못합니다.
- 같은 구간을 일주일 간격으로 녹음해 두면 진척이 객관적으로 드러납니다. 파일 이름에 날짜와 속도를 적으세요.
- 재생 장치에 지연이 있는 무선 이어폰은 박자 감각을 흐릴 수 있으니, 가능하면 유선이나 지연이 적은 기기를 쓰세요.
Charcoal Player로 하는 경우
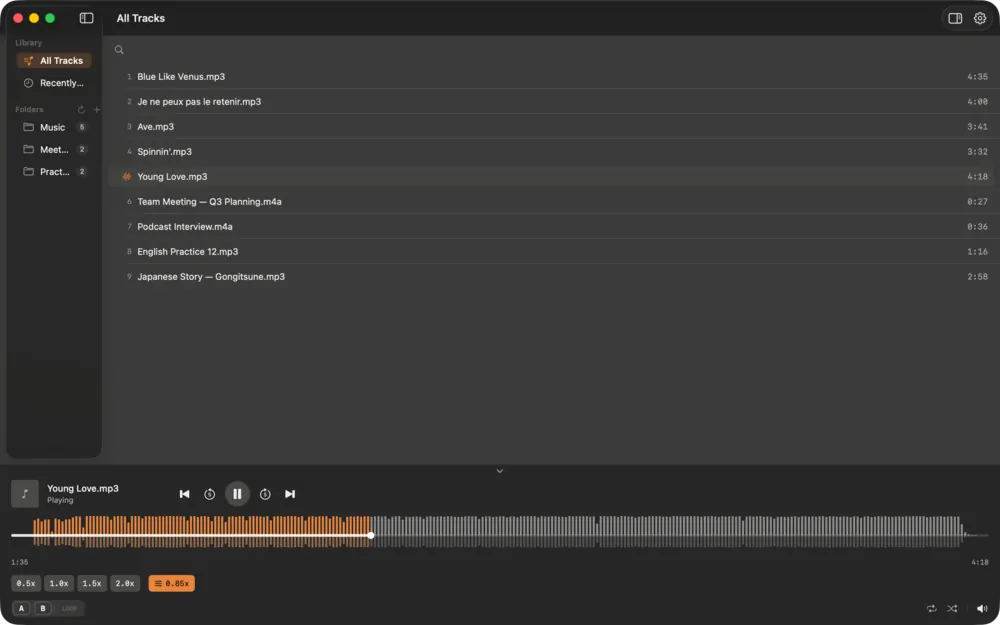
스템 분리와 음정 보존 배속, 구간 반복을 한 앱에서 처리하고 싶을 때의 선택지 중 하나로, 필자가 만들어 운영하는 Mac용 앱 Charcoal Player가 있습니다. 이 글에서 앱을 소개하는 곳은 이 섹션뿐이며, 위의 루틴은 어떤 도구로도 적용됩니다. 앱 문서와 스토어 설명에서 확인된 내용만 적습니다.
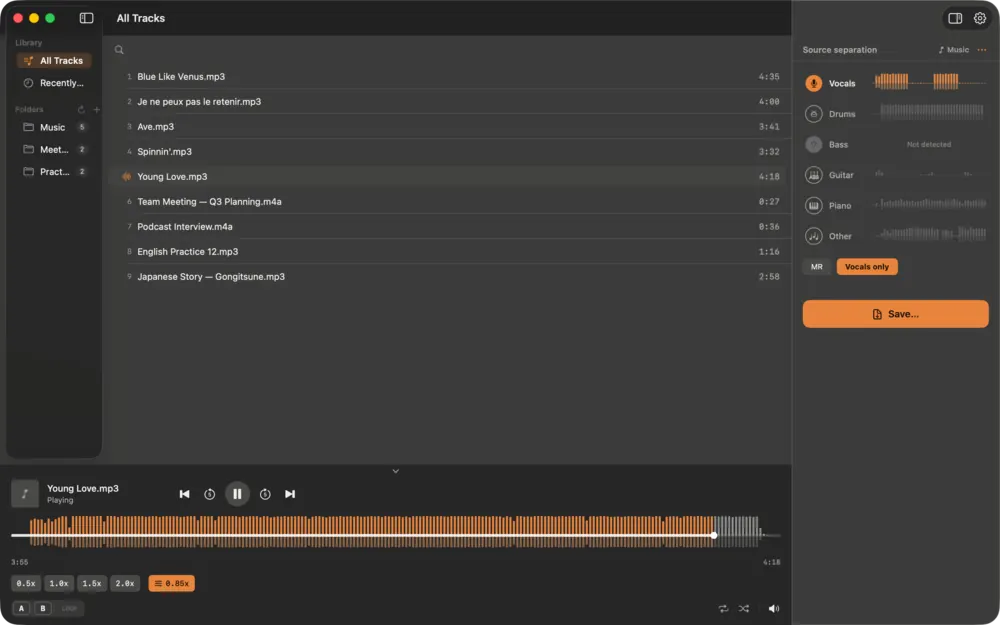
- 소리 분해: 기본 4개 파트(보컬·드럼·베이스·기타 악기류), 6개 모드에서는 기타와 피아노까지 분리. 기타·피아노 스템은 실험적 기능이라 곡에 따라 품질이 다릅니다.
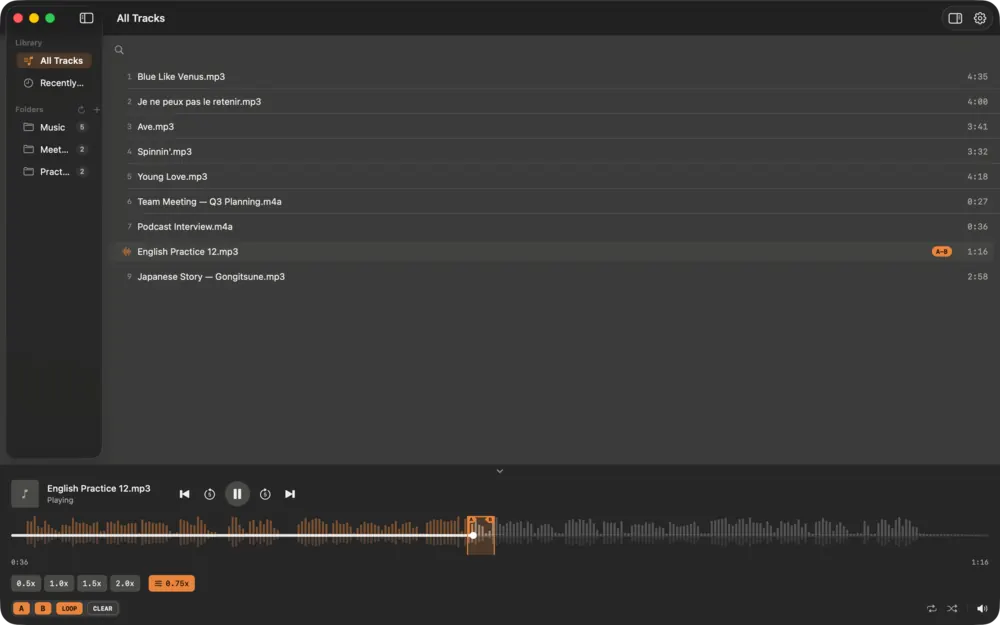
- 음정 유지 배속 0.5배~3.0배, 샘플 단위 A-B 반복, 이동 간격 0.5초~30초 설정.
- 분리 모델은 처음 한 번 동의 후 내려받고, 이후 분리는 Mac 안에서 처리되어 음악 파일이 서버로 올라가지 않습니다. macOS 15 이상, Mac 전용입니다.
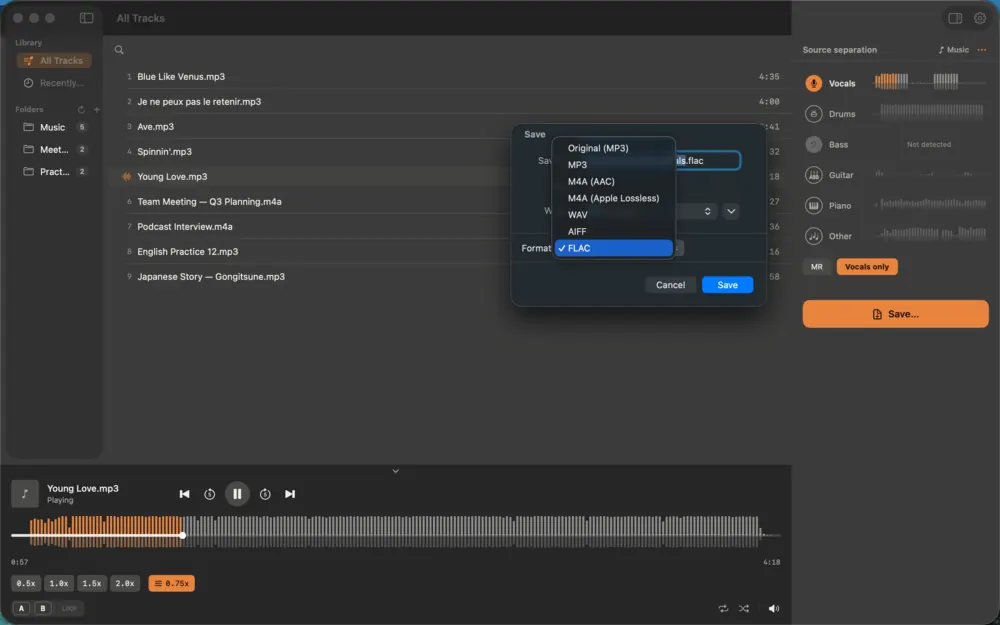
- 재생, 배속, A-B 반복, 소리 분해는 무료. 분리한 결과를 파일로 내보내는 기능은 24시간 동안 3회까지 무료이고 그 이상은 선택형 구독(또는 평생 구매)입니다. 가격은 스토어에서 확인하세요.
잘 맞는 경우
- Mac에서 한 앱으로 분리·배속·반복을 하고 싶은 사람
- 음악 파일이 서버로 나가지 않기를 바라는 사람
- 어학용 구간 반복이 필요한 사람
맞지 않는 경우
- Windows·iPhone·Android 사용자(Mac 전용)
- 기타·피아노 스템에 높은 정확도를 기대하는 경우
- 분리한 파일을 자주 대량 내보내야 하는 경우(무료는 24시간 3회)
분리 기능은 본인이 구입했거나 이용 권한이 있는 음악을 개인 연습에 쓰는 것을 전제로 합니다. 분리한 음원을 온라인에 올리거나 배포하거나 다른 작품에 쓰려면 저작권자의 허락이 필요할 수 있습니다. 나라마다 규정이 다르므로 구체적인 상황은 권리자나 전문가에게 확인하세요. 이 글은 법률 자문이 아닙니다. 자세한 사용법은 Charcoal Player 가이드에 있습니다.
출처 및 더 읽을거리
- Rouard, Massa, Défossez, "Hybrid Transformers for Music Source Separation" (arXiv): arxiv.org/abs/2211.08553
- Demucs 프로젝트 README (스템 구성, 6스템 실험 모델의 품질 안내): github.com/facebookresearch/demucs
검증하지 못해 쓰지 않은 항목: 개별 상용 앱의 분리 품질 비교 수치, 연습 시간과 숙련도의 정량적 관계(일반적인 연습 요령으로만 서술). 연습 단계의 퍼센트와 시간은 권장 예시이며 개인차가 있습니다.
자주 묻는 질문
분리하면 원곡과 완전히 같은 음질인가요?
아닙니다. 분리된 트랙을 모두 합쳐도 원곡과 완전히 같지는 않습니다. 아티팩트와 번짐이 있으므로 연습용 참고 음원으로 쓰는 것이 현실적입니다.
어떤 곡이 분리가 잘 되나요?
악기 구성이 단순하고 녹음이 깨끗한 스튜디오 곡일수록 결과가 좋은 경향이 있습니다. 코러스와 효과음이 많거나 라이브 녹음은 품질이 떨어집니다.
무손실 음원이 꼭 필요한가요?
필수는 아니지만 압축이 심한 음원은 분리 결과의 잡음이 더 두드러집니다. 가능하면 무손실이나 높은 비트레이트 파일에서 시작하세요.
느리게 하면 음정이 변하지 않나요?
음정 보존 방식의 배속을 쓰면 속도만 바뀝니다. 다만 아주 느린 속도에서는 소리가 약간 뭉개질 수 있습니다.
초보자도 쓸 수 있나요?
네. 처음에는 파트를 끄고 켜는 것부터 시작하고, 속도 올리기는 천천히 익히세요. 정확도를 먼저, 속도는 나중입니다.
도움이 필요하면 어디로 문의하나요?
지원 페이지를 이용하세요.
Why stem separation helps practice
Two difficulties come up most often when learning an instrument: it is hard to pick out exactly what your part sounds like inside a finished mix, and practicing alone means no band to play with. Stem separation splits a mixed recording into tracks (stems) such as vocals, drums, bass and everything else. With them you can solo your part to transcribe it, or mute it and play along with the rest. That once required multitrack masters or purpose-made practice tracks.
It is not magic, though. The output has limits, and knowing them tells you what to use it for and what not to. This guide starts with principles and routines that apply to any tool, and near the end shows one example, an app I build.
How separation works
The sound from a speaker is already one waveform with every instrument added together. Your ear can pick instruments out of it, but for a computer, splitting "this is bass, this is vocals" from the waveform alone is hard. Modern separation models use neural networks trained on many songs, learning pairs of mixed audio and its original parts, then estimating each part from the mix of a new song.
The Demucs family of open-source models is described in a research paper that combines a hybrid time-and-spectrogram design with transformers. That paper (Hybrid Transformers for Music Source Separation) reports an SDR of 9.20 dB on MUSDB when trained with 800 extra songs [1]. SDR measures how close a separation is to the original, higher being better, but a single number does not capture how it sounds. The model splits into four stems by default (drums, bass, vocals, other) and offers an experimental six-stem model adding guitar and piano, whose documentation itself says the piano stem is "not working great at the moment" [2].
The key point is that separation is an estimate, not an extraction of the truth. The model guesses which parts of the mix belong to each instrument. It does well on arrangements it saw often in training, such as vocals plus a band, and can go wrong on unusual sounds or where many instruments overlap.
Quality limits: artifacts and bleed
- Artifacts: separated tracks can sound watery, metallic or warbly because the model's estimate does not match the original exactly.
- Bleed: another part leaks in, such as vocals faintly audible in the drum stem or hi-hat in the vocals. It is worse where sounds share the same frequency range.
- Song dependence: sparse arrangements with clean recording separate well; songs full of backing vocals, effects and reverb separate worse.
- Finer parts: guitar and piano are usually less accurate than the basic four. The Demucs README says guitar is decent while piano has much bleed and artifacts [2].
- Not a perfect sum: adding all stems back together does not give the original exactly.
The practical rule follows: treat the result as practice material and do the final check of a transcription against the original, the score and your own ear. If one note in a separated guitar track sounds doubtful, go back to the original and compare the same bars.
Input tips for better results
- Use lossless or high-bitrate audio. Heavily compressed sources have already lost information, so noise in the separation stands out more. Start from WAV, FLAC or ALAC if you can.
- Studio recordings beat live ones. Audience noise and room sound blur the boundaries between parts.
- Check on headphones. On speakers it is hard to tell bleed and artifacts apart.
- Decide what to mute by your goal (table below).
- Keep output formats straight. For practice alone, muting and unmuting inside the player is enough; exporting files is only needed to use them in another player or recording program.
| Goal | Mute | Listen to | Note |
|---|---|---|---|
| Drumming | Drums | Bass, guitar, vocals | Residual drum bleed hardly hurts timing practice |
| Bass | Bass | Drums, rest | Low notes are hard to hear on weak earbuds |
| Guitar or keys | Guitar or piano | Rhythm section, vocals | Separation accuracy may be lower here; check against the original |
| Singing | Vocals (backing only) | Backing | Solo the vocal to check lyrics and pronunciation |
| Transcribing, ear training | Nothing; solo one part | One part at a time | Use it as a clue, not the answer |
Workflows by instrument
Drummers
Mute the drums and play along with the real bass, guitar and vocals. That builds a feel for the song's flow and bar structure better than a bare metronome. Soloing the drum track shows fill order and hi-hat patterns. For a hard fill, loop one or two bars, slow down, and sort out the sticking first.
Bassists
Bass sits low, so ordinary earbuds make pitches hard to tell apart. Solo the bass, slow it down if needed and check each note. After transcribing, mute the bass and play with the drums to lock in with the kick.
Guitarists and keyboardists
Guitar and piano are the least consistent stems because many instruments overlap in their range. Treat the separated track as a clue, not the answer, and alternate with the original where unsure. Once you know the chord progression, muting the guitar and playing with the rhythm section is the most practical routine.
Singers
Soloing the vocal reveals breath placement, pitch handling and pronunciation. Sing along on a loop until it feels familiar, then mute the vocal and sing over the backing. Faint reverb from the original vocal can remain in the backing, which at first may blur with your own voice.
Starting slow and building speed
As important as separation is pitch-preserving speed change plus loop repeat. If pitch drops with speed you can no longer play along in tune, so use time-stretching that keeps pitch. At very slow speeds the sound may smear slightly, so alternate with the original to keep your sense of the real tempo. A suggested routine:
- Mark one or two hard bars as an A-B loop. Keep it short (one to four bars).
- Start at about 60 percent of the original speed and check that you can play it perfectly.
- After three clean repetitions in a row, raise the speed by only 5 to 10 percent.
- If errors start, drop one step and regain accuracy. Accuracy first, speed second.
- When the loop is stable, widen it a bar at a time to join the flow of the song.
- Finally, play along with the separated backing at full tempo, or with the whole original.
Splitting practice into 20 to 30 minute blocks tends to keep focus better than one long session; this is general advice and varies by person. If you feel pain or numbness in your wrists, fingers or neck, stop and rest, and consult a professional if it recurs. This is not medical advice. Keep headphone volume low enough that you could still hear someone speaking.
Practice tempo planner
The interactive tool in the Korean section above (Korean UI) builds a table of steps. Enter the original BPM, starting speed, step size, loop length in bars, beats per bar and repetitions per step. For a 120 BPM song starting at 60 percent and rising by 10 percent, it lists 72, 84, 96, 108 and 120 BPM. Move to the next step only after finishing a step without errors.
Playing along and ear training
Backing tracks for ensemble feel
A backing track with your part muted is a virtual band. Unlike a metronome it keeps the song's dynamics and section changes, so you learn from the song itself when to come in and when to rest. First aim to get through the whole song once at a slow speed, then raise the tempo. Practice carrying on after a mistake, because in a real ensemble you cannot stop.
Ear training with isolated parts
- Solo one part (say the bass) and loop one bar.
- Before touching the instrument, sing the notes or write them down.
- Play them and compare with the recording.
- When you find the notes, return to the original and confirm the same bar really has them; artifacts may have misled you.
- Note the date and speed of each practiced passage so progress shows.
Chord progressions, fill placement and harmony intervals also become clearer when heard one part at a time. Language learners can use the same idea: solo the vocal, repeat the pronunciation, then add the backing to match intonation.
Recording yourself
What you hear while playing differs from what comes out. Late in a practice cycle, record yourself and compare with the original.
- Record while listening to the backing on headphones. Playing it on speakers puts the backing into the recording.
- A phone voice recorder is enough; record from the same position each time for a fair comparison.
- Listen against the original part and compare one of timing (ahead or behind), pitch, tone or dynamics. Trying to judge everything at once fixes nothing.
- Record the same passage a week apart so progress is objective, and put the date and speed in the file name.
- Wireless earbuds with latency can blur your sense of timing; use wired or low-latency ones if possible.
With Charcoal Player
If you want separation, pitch-preserving speed change and loops in one app, one option is Charcoal Player, a Mac app I build and run. This is the only section about it; the routines above work with any tool. Only features confirmed in the app documentation and store description are listed.
- Source separation into four basic parts (vocals, drums, bass, other instruments); a six-part mode also separates guitar and piano. Those two are experimental and vary by song.
- Pitch-preserving speed from 0.5x to 3.0x, sample-accurate A-B repeat, and a skip interval adjustable from 0.5 to 30 seconds.
- The separation model is downloaded once after consent; after that, separation runs on the Mac and music files are not uploaded. Requires macOS 15 or later and is Mac only.
- Playback, speed change, A-B repeat and separation are free. Exporting separated results is free up to 3 times per 24 hours, then requires an optional subscription (or lifetime purchase). See the store for prices.
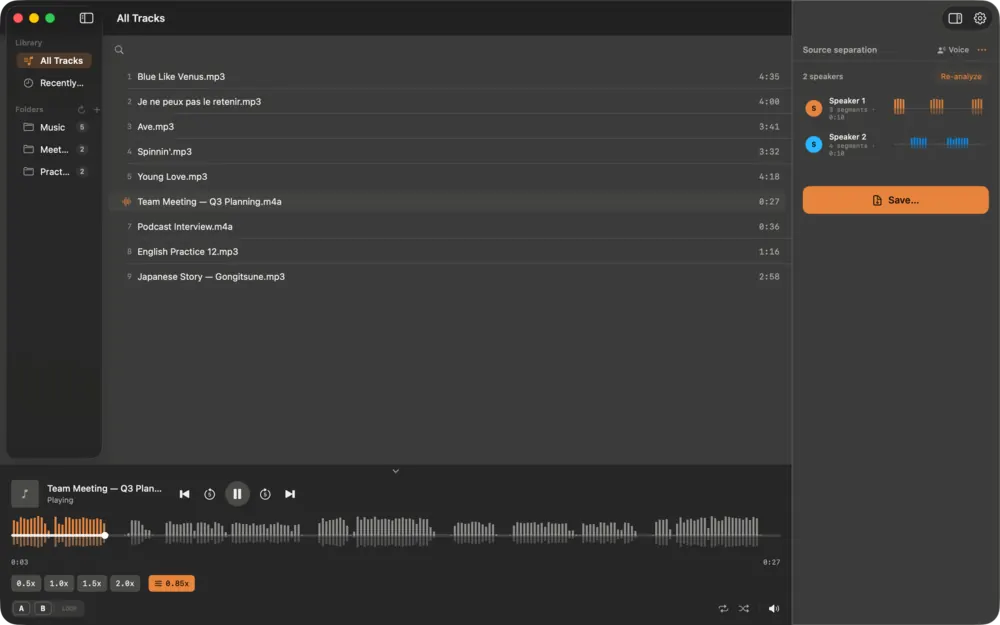
The screenshots in the Korean section show the library and transport controls, the six-lane separation panel (a lane reading "not detected" when a part is absent), an A-B loop at 0.75x, the export dialog offering MP3, AAC, Apple Lossless, WAV, AIFF and FLAC, and a Voice mode that splits a recorded conversation by speaker, which is more useful for language or meeting listening than for instruments.
Good fit
- Mac users wanting separation, speed and loops in one app
- People who want music files to stay on their computer
- Language learners who need segment repeat
Poor fit
- Windows, iPhone or Android users (Mac only)
- Anyone expecting high accuracy for guitar or piano stems
- Anyone who needs to export many separated files often (free is 3 per 24 hours)
The separation feature assumes you use music you own or have the right to use, for personal practice. Posting, distributing or reusing separated audio in other works may need the copyright holder's permission. Rules vary by country, so ask the rights holder or a professional about your situation. This is not legal advice. Details are in the Charcoal Player guide.
Sources
Same URLs as the Korean list above: Rouard, Massa and Défossez, "Hybrid Transformers for Music Source Separation" (arXiv 2211.08553) [1]; the Demucs project README (github.com/facebookresearch/demucs) [2]. Not verified, so left out: quality comparison figures for individual commercial apps and any quantitative link between practice time and skill, which are described only as general practice advice. The percentages and times in the routines are suggestions and vary by person.
FAQ
Is the separated audio identical in quality to the original?
No. Even all stems summed do not match the original exactly. Artifacts and bleed exist, so treat the result as a practice reference.
Which songs separate well?
Clean studio recordings with simple arrangements tend to separate best. Songs with many backing vocals and effects, and live recordings, separate worse.
Do I need lossless audio?
Not strictly, but heavily compressed sources make noise in the separation more noticeable. Start from lossless or high-bitrate files if you can.
Does slowing down change the pitch?
Not with pitch-preserving speed change; only the tempo changes. At very slow speeds the sound can smear slightly.
Can a beginner use this?
Yes. Start by muting and unmuting parts and build speed gradually. Accuracy first, speed later.
Where do I get help?
Use the support page.